| Zabbix for PostgreSQL部署技术文档 (上篇 / 前7章) 原作者:阿弟 创作时间:2017-08-05 21:06:23+08 |
doudou586 发布于2017-08-05 21:06:23
 评论: 4 评论: 4
 浏览: 27361 浏览: 27361
|
Zabbix for PostgreSQL部署技术文档
作者: PostgreSQL中国社区---阿弟
联系: 4893310 / 4893310@qq.com
欢迎大家踊跃投稿,投稿信箱: press@postgres.cn
目录
一、部署环境准备与说明
二、安装配置Postgresql
三、安装配置apache
四、安装配置php
五、安装zabbix server端
六、安装配置zabbix web管理平台
七、安装配置zabbix agent
八、配置使用pg_monz模板监制postgresql主机
九、zabbix action实战
十、给pg_monz模板添加监牢项并实现action
十一、建立自己的监控模板
十二、Dell服务器硬件运行状态监控
十三、建立监控看板Screens
一、部署环境准备与说明
1、首先要阅读部署需求requirement
https://www.zabbix.com/documentation/2.2/manual/installation/requirements
2、部署环境
| 主机 | 项目 | 值 |
|---|---|---|
| Zabbix server | 操作系统 | CentOS 6.9 |
| IP地址 | 192.168.0.231 | |
| Hostname | nfs | |
| Zabbix版本号 | 2.2.18 | |
| Postgresql version | 9.6.1 | |
| Apache | 2.2.31 | |
| Php | 5.5.38 | |
| Zabbix agent | 操作系统 | CentOS 6.9 |
| IP地址 | 192.168.0.232 | |
| Hostname | masterdb | |
| Zabbix版本号 | 2.2.18 | |
| Postgresql version | 9.6.1 | |
3、yum install支持包
[root@nfs ~]# yum install net-snmp net-snmp-devel libssh2 libssh2-devel OpenIPMI OpenIPMI-devel
openldap openldap-devel curl curl-devel readline readline-devel zlib zlib-devel libxml2
libxml2-devel libjpeg libjpeg-devel freetype freetype-devel libpng libpng-devel gd gd-devel
libiconv libiconv-devel openssl openssl-devel libxslt libxslt-devel perl-ExtUtils-Embed
pam-devel tcl tcl-devel openssl-devel python-devel sysstat psmisc
二、安装配置Postgresql
1、建立postgres用户
[root@nfs source]# adduser postgres
2、下载postgresql源码
[root@nfs source]# pwd
/home/postgres/source
[root@nfs source]# wget https://ftp.postgresql.org/pub/source/v9.6.1/postgresql-9.6.1.tar.gz
3、编译安装postgresql
[root@nfs source]# pwd
/home/postgres/source
[root@nfs source]# tar zxf postgresql-9.6.1.tar.gz
[root@nfs source]# cd postgresql-9.6.1
[root@nfs postgresql-9.6.1]# ./configure --prefix=/usr/local/pgsql9.6.1
[root@nfs postgresql-9.6.1]# gmake -j 8
[root@nfs postgresql-9.6.1]# gmake install
4、ln -s 一个当前运行的postgresql服务程序目录
[root@nfs postgresql-9.6.1]# ln -s /usr/local/pgsql9.6.1 /usr/local/pgsql
[root@nfs postgresql-9.6.1]# ll /usr/local/pgsql
lrwxrwxrwx. 1 root root 21 7月   3 10:49 /usr/local/pgsql -> /usr/local/pgsql9.6.1
5、初始化data
[postgres@nfs postgresql-9.6.1]$ /usr/local/pgsql9.6.1/bin/initdb --no-locale
-D /home/postgres/data9.6.1 -E utf8 -U postgres -W
6、ln -s一个当前运行的data标准目录
[postgres@nfs postgresql-9.6.1]$ ln -s /home/postgres/data9.6.1 /home/postgres/data
[postgres@nfs postgresql-9.6.1]$ ll /home/postgres/data
lrwxrwxrwx. 1 postgres postgres 24 7月  3 10:55 /home/postgres/data -> /home/postgres/data9.6.1
7、配置postgresql.conf
#允许服务监听范围,0.0.0.0允许监听所有 IPv4 地址
listen_addresses = '0.0.0.0'

#用户访问日志格式
log_destination = 'csvlog'
#启用用户访问日志收集器
logging_collector = on

postgresql.conf其它参数的配置请参考我写的“postgresql部署文档”
8、配置pg_hba.conf
#只给本地和192.168.0.0连接
host    all             all             127.0.0.1/32           md5
host    all             all             192.168.0.0/24         md5
9、配置Postgresql环境变量
在/etc/profile文件中增加下面内容
PGDATA=/home/postgres/data
PGHOST=127.0.0.1
PGDATABASE=postgres
PGUSER=postgres
PGPORT=5432

PATH=/usr/local/pgsql/bin:$PATH

export PGDATA PGHOST PGDATABASE PGUSER PGPORT PATH
环境变量生效
[root@nfs postgresql-9.6.1]# source /etc/profile
[root@nfs postgresql-9.6.1]# which psql
/usr/local/pgsql/bin/psql
下面配置postgresql的动态库到搜索路径中
[root@nfs postgresql-9.6.1]# vim /etc/ld.so.conf.d/pgsql.conf
/usr/local/pgsql/lib
搜索路径生效
[root@nfs postgresql-9.6.1]# ldconfig
[root@nfs postgresql-9.6.1]# ldconfig -p  | grep libpq
        libpqwalreceiver.so (libc6,x86-64) => /usr/local/pgsql/lib/libpqwalreceiver.so
        libpq.so.5 (libc6,x86-64) => /usr/local/pgsql/lib/libpq.so.5
        libpq.so (libc6,x86-64) => /usr/local/pgsql/lib/libpq.so
[root@nfs postgresql-9.6.1]#
10、启动PostgreSQL服务
因为我们上面配置了环境变量,所以我们可以这样启动服务
[root@nfs postgresql-9.6.1]# su postgres
[postgres@nfs postgresql-9.6.1]$ pg_ctl start
该命令与下面的语句是一样的效果
[postgres@nfs postgresql-9.6.1]$ /usr/local/pgsql9.6.1/bin/pg_ctl start -D /home/postgres/data9.6.1/
Postgresql服务管理见
http://www.postgres.cn/docs/9.6/app-pg-ctl.html
11、配置PostgreSQL服务开机自动启动
因为我们上面配置了环境变量,所以我们可以这样启动服务 在 /etc/rc.d/rc.local 文件中添加下面启动脚本
[root@nfs postgresql-9.6.1]# vim /etc/rc.d/rc.local
su postgres -c "/usr/local/pgsql/bin/pg_ctl start -D /home/postgres/data"
上面的语句等同于
su postgres -c "/usr/local/pgsql9.6.1/bin/pg_ctl start -D /home/postgres/data9.6.1"
三、安装配置apache
1、建立apache用户
[root@nfs ~]# adduser apache
2、下载apache源码
[root@nfs ~]# cd /home/postgres/source/
[root@nfs source]# wget http://mirrors.cnnic.cn/apache/httpd/httpd-2.2.31.tar.gz
3、编译安装apache
[root@nfs source]# tar zxf httpd-2.2.31.tar.gz
[root@nfs source]# cd httpd-2.2.31
[root@nfs httpd-2.2.31]# ./configure --prefix=/usr/local/apache-2.2.31 --enable-rewrite --enable-deflate
 --enable-expires --enable-headers --enable-modules=most --with-mpm=worker --enable-so
[root@nfs httpd-2.2.31]#gmake
[root@nfs httpd-2.2.31]#gmake install
详细的apache安装说明见我写的“postgresql+php+apache部署文档”
4、ln -s 一个当前运行的apache服务程序目录
[root@nfs httpd-2.2.31]# ln -s /usr/local/apache-2.2.31 /usr/local/apache
[root@nfs httpd-2.2.31]# ll /usr/local/apache
lrwxrwxrwx. 1 root root 24 7月   3 14:09 /usr/local/apache -> /usr/local/apache-2.2.31
5、建立脚本根目录
[root@nfs httpd-2.2.31]# mkdir /home/www
6、配置httpd.conf运行参数
[root@nfs httpd-2.2.31]# vim /usr/local/apache/conf/httpd.conf

#监听port
Listen 80

#运营apache服务的用户及用户组,为apache
User apache
Group apache

#管理员的邮箱是 4893310@qq.co
ServerAdmin 4893310@qq.co

#配置脚本根目录
DocumentRoot "/home/www"

#配置
ServerName 127.0.0.1:80
<Directory />
    Options FollowSymLinks
    AllowOverride None
    Order deny,allow
    allow from all
</Directory>

<Directory "/home/www">
    Options Indexes FollowSymLinks
    AllowOverride None
    Order allow,deny
    Allow from all
</Directory>
7、配置apache环境变量
在/etc/profile文件中增加下面内容
PATH=/usr/local/apache/bin:$PATH
export PATH
环境变量生效
[root@nfs httpd-2.2.31]# source /etc/profile
[root@nfs httpd-2.2.31]# which apachectl
/usr/local/apache/bin/apachectl
8、启动apache服务
因为我们上面配置了环境变量,所以我们可以这样启动服务
[root@nfs httpd-2.2.31]# apachectl start
该命令与下面的语句是一样的效果
[root@nfs httpd-2.2.31]# /usr/local/apache-2.2.31/bin/apachectl start
或者
[root@nfs httpd-2.2.31]# /usr/local/apache/bin/apachectl start
9、配置apache服务开机自动启动
因为我们上面配置了环境变量,所以我们可以这样启动服务
在 /etc/rc.d/rc.local 文件中添加下面启动脚本
[root@nfs apache]# vim /etc/rc.d/rc.local
/usr/local/apache/bin/apachectl start
上面的语句等同于
/usr/local/apache-2.2.31/bin/apachectl start
四、安装配置php
1、编译php依赖包
[root@nfs ~]# cd /home/postgres/source/
[root@nfs source]# wget http://ftp.gnu.org/pub/gnu/libiconv/libiconv-1.14.tar.gz
[root@nfs source]# tar zxf libiconv-1.14.tar.gz
[root@nfs source]# cd libiconv-1.14
[root@nfs source]# ./configure --prefix=/usr/local/libiconv
[root@nfs source]# make
[root@nfs source]# make install
2、下载php源码
[root@nfs ~]# cd /home/postgres/source/
[root@nfs source]# wget http://cn2.php.net/get/php-5.5.38.tar.gz/from/this/mirror
3、编译安装php
[root@nfs source]# mv mirror php-5.5.38.tar.gz
[root@nfs source]# tar zxf php-5.5.38.tar.gz
[root@nfs source]# cd php-5.5.38
[root@nfs php-5.5.38]# ./configure --prefix=/usr/local/php --with-apxs2=/usr/local/apache/bin/apxs
--with-xmlrpc --with-openssl --with-zlib --with-freetype-dir --with-gd --with-jpeg-dir --with-png-dir
--with-iconv=/usr/local/libiconv --enable-short-tags --enable-sockets --enable-soap --enable-mbstring
--enable-static --enable-gd-native-ttf --with-curl --with-xsl --enable-ftp --with-libxml-dir
--with-pgsql=/usr/local/pgsql --enable-fpm --enable-bcmath --with-gettext
[root@nfs php-5.5.38]# gmake
[root@nfs php-5.5.38]# gmake install
详细的php安装说明见我写的“postgresql+php+apache部署文档”
4、配置php.ini运行参数
[root@nfs php-5.5.38]# cp php.ini-development /usr/local/php/lib/php.ini
[root@nfs php-5.5.38]# vim /usr/local/php/lib/php.ini

error_reporting = E_ALL & ~E_NOTICE

#报告所有的错误,但除了E_NOTICE这一种
display_errors = On
#在终端显示出错信息,这个在生产环境最好设置成off
track_errors = Off
#是否在变量$php_errormsg中保存最近一个错误或警告消息
post_max_size = 16M
#表单最大提交的数据量大小
upload_max_filesize = 16M
#准许上传文件大小限制为16M

date.timezone = PRC
#中华人民共和国时区

expose_php = Off
#隐藏php版本信息

curl -I www.ha97.com
HTTP/1.1 200 OK
Server: nginx
Date: Tue, 20 Jul 2010 05:45:13 GMT
Content-Type: text/html; charset=UTF-8
Connection: keep-alive
Vary: Accept-Encoding
#已经彻底隐藏了PHP版本。

extension_dir = "/usr/local/php/lib/php/extensions/no-debug-zts-20121212/"
#扩展模块存放目录
5、配置httpd.conf运行参数
[root@nfs php-5.5.38]# vim /usr/local/apache/conf/httpd.conf
增加下面内容
<IfModule dir_module>
    DirectoryIndex index.php index.html
</IfModule>

<IfModule mime_module>
    AddType application/x-httpd-php-source .phps
    AddType application/x-httpd-php .php .phtml
</IfModule>
6、重启apache服务
因为我们上面配置了环境变量,所以我们可以这样重启服务
[postgres@nfs php-5.5.38]$ apachectl restart
该命令与下面的语句是一样的效果
[root@nfs php-5.5.38]# /usr/local/apache-2.2.31/bin/apachectl start
或者
[root@nfs php-5.5.38]# /usr/local/apache/bin/apachectl start
五、安装zabbix server端
1、建立zabbix server运行用户
[root@nfs source]# adduser zabbix
2、源码下载
[root@nfs source]# pwd
/home/postgres/source
[root@nfs source]# wget https://ncu.dl.sourceforge.net/project/zabbix/ZABBIX%20Latest%20Stable/2.2.18/zabbix-2.2.18.tar.gz
3、编译安装zabbix server
[root@nfs source]# pwd
/home/postgres/source

[root@nfs source]# tar zxf zabbix-2.2.18.tar.gz
[root@nfs source]# cd zabbix-2.2.18
[root@nfs zabbix-2.2.18]# ./configure --prefix=/usr/local/zabbix2.2.6 --enable-server --enable-proxy
--enable-agent --enable-ipv6 --with-postgresql=/usr/local/pgsql/bin/pg_config --with-net-snmp
--with-ssh2 --with-openipmi --with-ldap --with-libcurl --with-iconv
[root@nfs zabbix-2.2.18]#gmake
[root@nfs zabbix-2.2.18]#gmake install
./configure缺少支持包出错的解决办法
1)、缺少了net-snmp支持包
checking pkg-config is at least version 0.9.0... yes
checking for net-snmp-config... no
configure: error: Invalid Net-SNMP directory - unable to find net-snmp-config
[root@nfs zabbix-2.2.18]# yum install net-snmp-devel
2)、缺少了libssh2支持包
checking for SSH2 support... no
configure: error: SSH2 library not found
[root@nfs zabbix-2.2.18]# yum install libssh2-devel
3)、缺少OpenIPMI支持包
checking for OPENIPMI support... no
configure: error: Invalid OPENIPMI directory - unable to find ipmiif.h
[root@nfs zabbix-2.2.18]# yum install OpenIPMI-devel
4)、缺少ldap支持包
checking for LDAP support... no
configure: error: Invalid LDAP directory - unable to find ldap.h
[root@nfs zabbix-2.2.18]# yum install openldap-devel
5)、缺少curl支持包
checking for curl-config... no
configure: error: Curl library not found
[root@nfs zabbix-2.2.18]# yum install curl-devel
更多的编译配置选项见这里
https://www.zabbix.com/documentation/2.2/manual/installation/install
4、ln -s 一个当前运行的zabbix服务程序目录
[root@nfs zabbix-2.2.18]# ln -s /usr/local/zabbix2.2.6 /usr/local/zabbix
[root@nfs zabbix-2.2.18]# ll /usr/local/zabbix
lrwxrwxrwx. 1 root root 22 7月   3 13:53 /usr/local/zabbix -> /usr/local/zabbix2.2.6
[root@nfs zabbix-2.2.18]#
5、配置zabbix环境变量
在/etc/profile文件中增加下面内容
PATH=/usr/local/zabbix/bin:/usr/local/zabbix/sbin:$PATH
export PATH
环境变量生效
[root@nfs zabbix-2.2.18]# source /etc/profile
[root@nfs zabbix-2.2.18]# which zabbix_server
/usr/local/zabbix/sbin/zabbix_server
[root@nfs zabbix-2.2.18]#
6、创建zabbix数据库
[root@nfs zabbix-2.2.18]# su postgres
[postgres@nfs zabbix-2.2.18]$ psql -h 127.0.0.1 -U postgres -d postgres -p 5432
psql (9.6.1)
Type "help" for help.

postgres=# create role zabbix login ;
CREATE ROLE
postgres=# \password zabbix
Enter new password:
Enter it again:
postgres=# create database zabbix with template template0 encoding 'UTF8' ;
CREATE DATABASE
postgres=# grant all on database zabbix to zabbix;
GRANT
postgres=# \q
[postgres@nfs zabbix-2.2.18]$ cd /home/postgres/source/zabbix-2.2.18/database/postgresql/
[postgres@nfs postgresql]$
[postgres@nfs postgresql]$ psql -h 127.0.0.1 -d zabbix -U zabbix -p 5432 -f schema.sql
[postgres@nfs postgresql]$ psql -h 127.0.0.1 -d zabbix -U zabbix -p 5432 -f images.sql
[postgres@nfs postgresql]$ psql -h 127.0.0.1 -d zabbix -U zabbix -p 5432 -f data.sql
7、配置zabbix server运行参数
[root@nfs zabbix-2.2.18]# vim /usr/local/zabbix/etc/zabbix_server.conf

#监听port
ListenPort=10051

#日志存放地点及大小
LogFile=/tmp/zabbix_server.log
LogFileSize=10

#pid文件存放地点
PidFile=/tmp/zabbix_server.pid

#下面几个参数是配置数据库连接参数
DBHost=127.0.0.1
DBName=zabbix
DBUser=zabbix
DBPassword=zabbix
DBPort=5432

#监听ip范围
ListenIP=0.0.0.0

#media types中使用script存放目录
AlertScriptsPath=/usr/local/zabbix/alertscripts
8、zabbix server服务管理
1)、启动服务
因为我们上面配置了环境变量,所以我们可以这样启动服务
[root@nfs zabbix-2.2.18]# zabbix_server -c /usr/local/zabbix/etc/zabbix_server.conf
该命令与下面的语句是一样的效果
[root@nfs zabbix-2.2.18]# /usr/local/zabbix/sbin/zabbix_server -c /usr/local/zabbix/etc/zabbix_server.conf
2)、重载配置文件
[root@nfs zabbix-2.2.18]# zabbix_server -c /usr/local/zabbix/etc/zabbix_server.conf -R config_cache_reload
3)、关闭服务
[root@nfs zabbix-2.2.18]# killall zabbix_server
9、编写zabbix server服务管理脚本
1)、编写代码
[root@nfs init.d]# vim /etc/rc.d/init.d/zabbix_server

#!/bin/bash
#chkconfig:2345 90 10
#description:zabbix_server

#Zabbix安装路径
BASEDIR=/usr/local/zabbix

#程序名称
BINARY_NAME=zabbix_server

#程序全路径
FULLPATH=$BASEDIR/sbin/$BINARY_NAME

#配置文件全路径
ETCFULLPATH=$BASEDIR/etc/zabbix_server.conf

# PID 文件存放地点
PIDFILE=/tmp/$BINARY_NAME.pid

#获取zabbix_server的运行状态

if [ -f $PIDFILE  ] && [ -s $PIDFILE ]; then
    PID=`cat $PIDFILE`
    if [ "x$PID" != "x" ] && kill -0 $PID 2>/dev/null && [ $BINARY_NAME == `ps -e | grep $PID
  | awk '{print $4}'` ]; then
        STATUS="$BINARY_NAME (pid `pidof $BINARY_NAME`) already running.."
        RUNNING=1
    else
        rm -f $PIDFILE
        STATUS="$BINARY_NAME (pid file existed ($PID) and now removed) not running.."
        RUNNING=0
    fi
else
    if [ `ps -e | grep $FULLPATH | head -1 | awk '{ print $1 }'` ]; then
        STATUS="$BINARY_NAME (pid `pidof $BINARY_NAME`, but no pid file) running.."
    else
        STATUS="$BINARY_NAME (no pid file) not running"
    fi
    RUNNING=0
fi

# start函数
start() {
if [ $RUNNING -eq 1 ]; then
    #echo "$BINARY_NAME (pid $PID) already running"
    echo $STATUS
else
    echo "Starting $BINARY_NAME"
    $FULLPATH -c $ETCFULLPATH
fi
}

#reload函数
reload() {
if [ $RUNNING -eq 0 ]; then
    echo $STATUS
else
    echo "Reload $BINARY_NAME "
    $FULLPATH -c $ETCFULLPATH -R config_cache_reload
fi
}

#stop函数
stop() {
if [ $RUNNING -eq 0 ]; then
    echo $STATUS
else
    echo "Stoping $BINARY_NAME "
    /usr/bin/killall $FULLPATH
    sleep 3
    RUNNING=0
fi
}

#status 函数
status() {
    echo $STATUS
}


# 执行
case "$1" in
    start)
        start
        ;;
    stop)
        stop
        ;;
    reload)
        reload
        ;;
    status)
        status $BINARY_NAME
        ;;
    restart)
        stop
        start
        ;;
    help|*)
        echo $"Usage: $0 {start|reload|stop|status|restart|help}"
        cat <<EOF
            start  - start $BINARY_NAME
            reload  - reload $BINARY_NAME
            stop  - stop $BINARY_NAME
            status  - show current status of $BINARY_NAME
            restart  - restart $BINARY_NAME if running by sending a SIGHUP or start if not running
            help  - this screen
EOF
        exit 1
        ;;
esac
exit 0

[root@nfs init.d]# chmod +x /etc/rc.d/init.d/zabbix_server
2)、测试脚本使用
[root@nfs init.d]# /etc/rc.d/init.d/zabbix_server start
Starting zabbix_server

[root@nfs init.d]# /etc/rc.d/init.d/zabbix_server reload
Reload zabbix_server
command sent successfully

[root@nfs init.d]# /etc/rc.d/init.d/zabbix_server status
zabbix_server (pid 26598 26597 26596 26595 26594 26593 26592 26591 26590 26589 26588 26581
26580 26579 26578 26577 26576 26575 26573 26572 26571 26570 26569 26568 26567 26566 26563)
already running..

[root@nfs init.d]# /etc/rc.d/init.d/zabbix_server restart
Stoping zabbix_server
Starting zabbix_server

[root@nfs init.d]# /etc/rc.d/init.d/zabbix_server stop
Stoping zabbix_server

[root@nfs init.d]# /etc/rc.d/init.d/zabbix_server help
Usage: /etc/rc.d/init.d/zabbix_server {start|reload|stop|status|restart|help}
            start  - start zabbix_server
            reload  - reload zabbix_server
            stop  - stop zabbix_server
            status  - show current status of zabbix_server
            restart  - restart zabbix_server if running by sending a SIGHUP or start if not running
            help  - this screen
11、配置zabbix server服务开机自动启动
1)、配置开机自动启动
[root@nfs init.d]# chkconfig --add zabbix_server
[root@nfs init.d]# chkconfig zabbix_server on
[root@nfs init.d]# chkconfig --list | grep zabbix_server
zabbix_server   0:关闭  1:关闭  2:启用  3:启用  4:启用  5:启用  6:关闭
[root@nfs init.d]#
2)、测试服务的使用情况
[root@nfs init.d]# service zabbix_server start
Starting zabbix_server

[root@nfs init.d]# service zabbix_server status
zabbix_server (pid 27083 27082 27081 27080 27079 27078 27077 27066 27065 27064 27063 27062 27061
27060 27059 27058 27057 27056 27055 27054 27053 27052 27051 27050 27049 27048 27045)
already running..

[root@nfs init.d]# service zabbix_server reload
Reload zabbix_server
command sent successfully

[root@nfs init.d]# service zabbix_server restart
Stoping zabbix_server
Starting zabbix_server

[root@nfs init.d]# service zabbix_server stop
Stoping zabbix_server

[root@nfs init.d]# service zabbix_server help
Usage: /etc/init.d/zabbix_server {start|reload|stop|status|restart|help}
            start  - start zabbix_server
            reload  - reload zabbix_server
            stop  - stop zabbix_server
            status  - show current status of zabbix_server
            restart  - restart zabbix_server if running by sending a SIGHUP or start if not running
            help  - this screen
[root@nfs init.d]#
12、zabbix server运行出错的解决办法
1)、cannot create Semaphore: [28] No space left on device
[root@nfs zabbix-2.2.18]# cat /tmp/zabbix_server.log
zabbix_server [10746]: cannot create Semaphore: [28] No space left on device
zabbix_server [10746]: unable to create mutex for log file
这是Linux中可以执行的信号操作的数量太了,编辑 /etc/sysctl.conf,调大其量即可
解决办法
[root@nfs zabbix-2.2.18]# vim /etc/sysctl.conf
kernel.sem = 5010 1282560 5010 256
参数生效
[root@nfs zabbix-2.2.18]# sysctl -p
六、安装配置zabbix web管理平台
1、复制zabbix web程序到apache根目录
[root@nfs zabbix-2.2.18]# cd /home/postgres/source/zabbix-2.2.18/frontends/php/
[root@nfs php]# cp * /home/www -Rf
[root@nfs php]# cd /home/www

#修改conf目录为apache用户
[root@nfs www]# chown apache:apache conf
2、打开浏览器进入zabbix-web安装程序
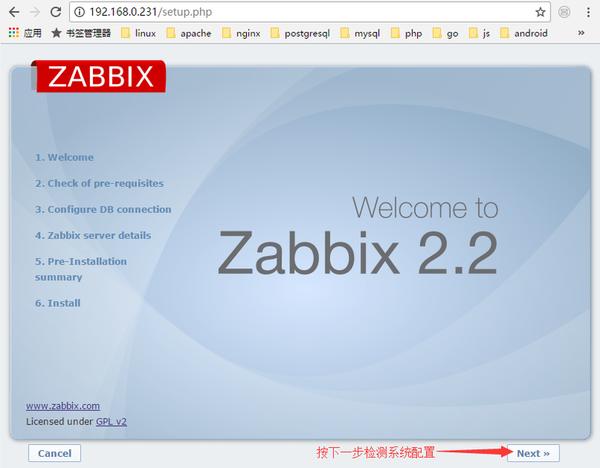
打开浏览器输入 192.168.0.231 (zabbix-server部署机器ip地址),出现上面的安装向导首页,然后按next按钮,接下系统系统会检查所有需求参数


配置文件存放路为下所示
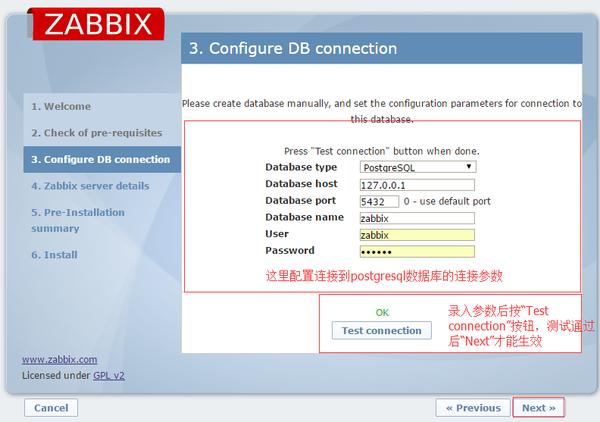
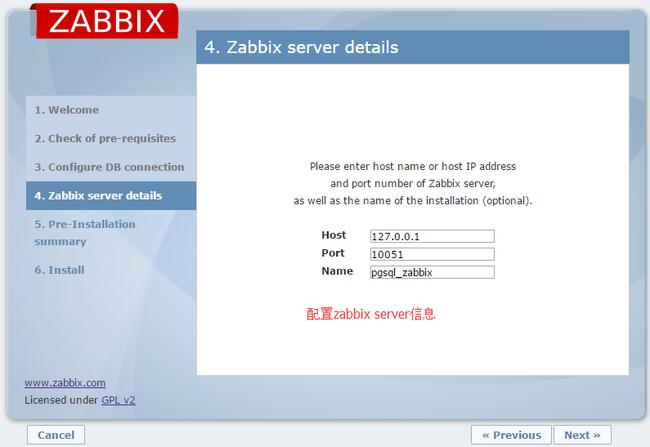
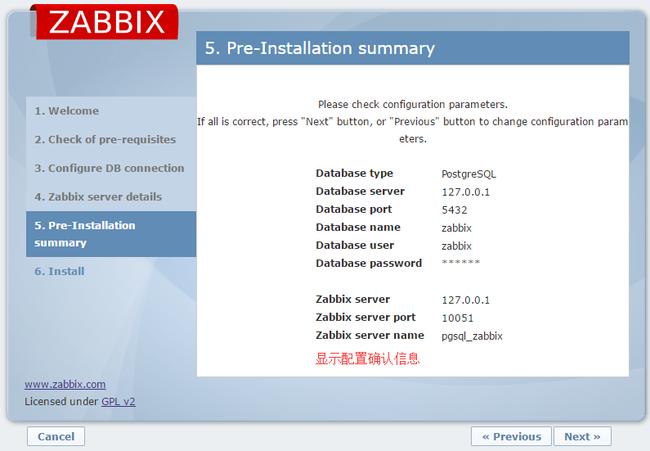
[root@nfs conf]# pwd
/home/www/conf
[root@nfs conf]# cat zabbix.conf.php
<?php
// Zabbix GUI configuration file
global $DB;

$DB['TYPE']     = 'POSTGRESQL';
$DB['SERVER']   = '127.0.0.1';
$DB['PORT']     = '5432';
$DB['DATABASE'] = 'zabbix';
$DB['USER']     = 'zabbix';
$DB['PASSWORD'] = 'zabbix';

// SCHEMA is relevant only for IBM_DB2 database
$DB['SCHEMA'] = '';

$ZBX_SERVER      = '127.0.0.1';
$ZBX_SERVER_PORT = '10051';
$ZBX_SERVER_NAME = 'pgsql_zabbix';

$IMAGE_FORMAT_DEFAULT = IMAGE_FORMAT_PNG;
?>
[root@nfs conf]#
如果今后需要修改这些数值,可以直接打开这个这件修改即可
3、修改conf目录及时面文件所属用户
[root@nfs conf]# chown root:root /home/www/conf -Rf
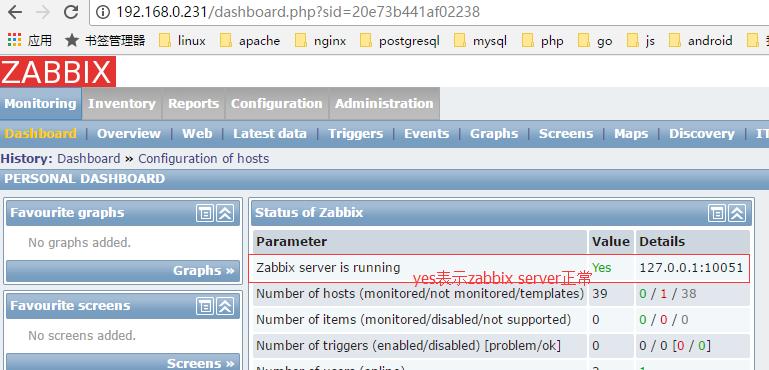
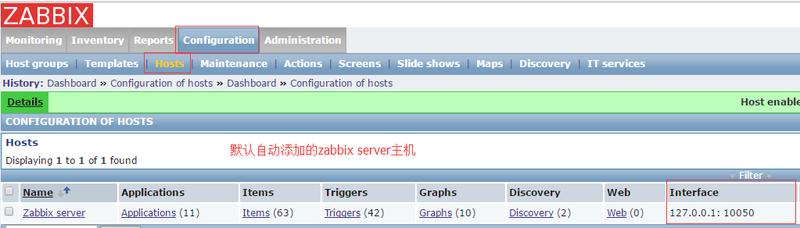
4、进入管理平台

Zabbix默认账号,用户Admin 密码zabbix
[postgres@nfs conf]$ psql -d zabbix -U zabbix
psql (9.6.1)
Type "help" for help.

zabbix=> select userid,alias,name,surname,passwd from users;
 userid | alias |  name  |    surname    |              passwd
--------+-------+--------+---------------+----------------------------------
      1 | Admin | Zabbix | Administrator | 5fce1b3e34b520afeffb37ce08c7cd66
      2 | guest |        |               | d41d8cd98f00b204e9800998ecf8427e
(2 rows)

zabbix=>
七、安装配置zabbix agent
1、源码下载
[root@masterdb source]# pwd
/home/postgres/source
[root@masterdb source]# wget https://ncu.dl.sourceforge.net/project/zabbix/ZABBIX%20Latest%20Stable/2.2.18/zabbix-2.2.18.tar.gz
2、编译安装zabbix agent
[root@masterdb source]# pwd
/home/postgres/source
[root@masterdb source]# tar zxf zabbix-2.2.18.tar.gz
[root@masterdb source]# cd zabbix-2.2.18
[root@masterdb zabbix-2.2.18]# ./configure --prefix=/usr/local/zabbix2.2.6 --enable-agent
[root@masterdb zabbix-2.2.18]#gmake
[root@masterdb zabbix-2.2.18]#gmake install
3、ln -s 一个当前运行的zabbix服务程序目录
[root@masterdb zabbix-2.2.18]# ln -s /usr/local/zabbix2.2.6 /usr/local/zabbix
[root@masterdb zabbix-2.2.18]# ll /usr/local/zabbix
lrwxrwxrwx. 1 root root 22 7月   3 17:53 /usr/local/zabbix -> /usr/local/zabbix2.2.6
[root@masterdb zabbix-2.2.18]#
4、配置zabbix环境变量
在/etc/profile文件中增加下面内容
PATH=/usr/local/zabbix/bin:/usr/local/zabbix/sbin:$PATH
export $PATH
环境变量生效
[root@masterdb zabbix-2.2.18]# source /etc/profile
[root@masterdb zabbix-2.2.18]# which zabbix_agentd
/usr/local/zabbix/sbin/zabbix_agentd
5、配置zabbix agent运行参数
[root@masterdb zabbix-2.2.18]# vim /usr/local/zabbix/etc/zabbix_agentd.conf

#监听port
ListenPort=10050

#日志存放地点及大小
LogFile=/tmp/zabbix_agentd.log
LogFileSize=10

准许远程执行命令
EnableRemoteCommands=1
LogRemoteCommands=1

#配置zabbix server服务器地址及port
Server=192.168.0.231

#pid文件存放地点
PidFile=/tmp/zabbix_agentd.pid

#监听ip范围
ListenIP=0.0.0.0
#预生成的zabbix agent进程数
StartAgents=8

#主动监听zabbix server地址及端口
ServerActive=192.168.0.231:10051
#主动监听刷新频率,单位为秒
RefreshActiveChecks=60

#zabbix agent的主机名,同一zabbix server下的每一台台zabbix agent的Hostname不能相同
Hostname=pg232

#包含子配置文件的路径
Include=/usr/local/zabbix/etc/zabbix_agentd.conf.d/
6、zabbix agent服务管理
1)、启动服务
[root@masterdb etc]# su postgres -c "zabbix_agentd -c /usr/local/zabbix/etc/zabbix_agentd.conf"
2)、关闭服务
[root@masterdb ~]$ killall zabbix_agentd
7、编写zabbix agent服务管理脚本
1)、编写代码
[root@masterdb init.d]# vim /etc/rc.d/init.d/zabbix_agentd
#!/bin/bash
#chkconfig:2345 90 10
#description:zabbix_agentd

#Zabbix安装路径
BASEDIR=/usr/local/zabbix

#程序名称
BINARY_NAME=zabbix_agentd

#程序全路径
FULLPATH=$BASEDIR/sbin/$BINARY_NAME

#配置文件全路径
ETCFULLPATH=$BASEDIR/etc/zabbix_agentd.conf

# PID 文件存放地点
PIDFILE=/tmp/$BINARY_NAME.pid

#获取zabbix_agentd的运行状态

if [ -f $PIDFILE  ] && [ -s $PIDFILE ]; then
    PID=`cat $PIDFILE`
    if [ "x$PID" != "x" ] && kill -0 $PID 2>/dev/null && [ $BINARY_NAME == `ps -e | grep $PID
| awk '{print $4}'` ]; then
        STATUS="$BINARY_NAME (pid `pidof $BINARY_NAME`) already running.."
        RUNNING=1
    else
        rm -f $PIDFILE
        STATUS="$BINARY_NAME (pid file existed ($PID) and now removed) not running.."
        RUNNING=0
    fi
else
    if [ `ps -e | grep $FULLPATH | head -1 | awk '{ print $1 }'` ]; then
        STATUS="$BINARY_NAME (pid `pidof $BINARY_NAME`, but no pid file) running.."
    else
        STATUS="$BINARY_NAME (no pid file) not running"
    fi
    RUNNING=0
fi

# start函数
start() {
if [ $RUNNING -eq 1 ]; then
    #echo "$BINARY_NAME (pid $PID) already running"
    echo $STATUS
else
    echo "Starting $BINARY_NAME"
    su postgres -c "$FULLPATH -c $ETCFULLPATH"
fi
}

#stop函数
stop() {
if [ $RUNNING -eq 0 ]; then
    echo $STATUS
else
    echo "Stoping $BINARY_NAME "
    su postgres -c "/usr/bin/killall $FULLPATH"
    sleep 3
    RUNNING=0
fi
}

#status 函数
status() {
    echo $STATUS
}


# 执行
case "$1" in
    start)
        start
        ;;
    stop)
        stop
        ;;
    status)
        status $BINARY_NAME
        ;;
    restart)
        stop
        start
        ;;
    help|*)
        echo $"Usage: $0 {start|stop|status|restart|help}"
        cat <<EOF
            start  - start $BINARY_NAME
            stop  - stop $BINARY_NAME
            status  - show current status of $BINARY_NAME
            restart  - restart $BINARY_NAME if running by sending a SIGHUP or start if not running
            help  - this screen
EOF
        exit 1
        ;;
esac
exit 0

[root@masterdb init.d]# chmod +x /etc/rc.d/init.d/zabbix_agentd
2)、测试服务使用
[root@masterdb init.d]# /etc/rc.d/init.d/zabbix_agentd start
Starting zabbix_agentd

[root@masterdb init.d]# /etc/rc.d/init.d/zabbix_agentd status
zabbix_agentd (pid 125228 125227 125226 125225 125224 125223 125222 125221 125220 125219 125218)
already running..

[root@masterdb init.d]# /etc/rc.d/init.d/zabbix_agentd restart
Stoping zabbix_agentd
Starting zabbix_agentd

[root@masterdb init.d]# /etc/rc.d/init.d/zabbix_agentd stop
Stoping zabbix_agentd

[root@masterdb init.d]# /etc/rc.d/init.d/zabbix_agentd help
Usage: /etc/rc.d/init.d/zabbix_agentd {start|stop|status|restart|help}
            start  - start zabbix_agentd
            stop  - stop zabbix_agentd
            status  - show current status of zabbix_agentd
            restart  - restart zabbix_agentd if running by sending a SIGHUP or start if not running
            help  - this screen
8、配置zabbix agent服务开机自动启动
1)、配置开机自动启动
[root@masterdb init.d]# chkconfig --add zabbix_agentd
[root@masterdb init.d]# chkconfig zabbix_agentd on
[root@masterdb init.d]# chkconfig --list | grep zabbix_agentd
zabbix_agentd   0:关闭  1:关闭  2:启用  3:启用  4:启用  5:启用  6:关闭
[root@masterdb init.d]#
2)、测试服务的使用情况
[root@masterdb init.d]# service zabbix_agentd start
Starting zabbix_agentd

[root@masterdb init.d]# service zabbix_agentd restart
Stoping zabbix_agentd
Starting zabbix_agentd

[root@masterdb init.d]# service zabbix_agentd status
zabbix_agentd (pid 127900 127899 127898 127897 127896 127895 127894 127893 127892 127891 127890)
already running..

[root@masterdb init.d]# service zabbix_agentd stop
Stoping zabbix_agentd

[root@masterdb init.d]# service zabbix_agentd help
Usage: /etc/init.d/zabbix_agentd {start|stop|status|restart|help}
            start  - start zabbix_agentd
            stop  - stop zabbix_agentd
            status  - show current status of zabbix_agentd
            restart  - restart zabbix_agentd if running by sending a SIGHUP or start if not running
            help  - this screen
[root@masterdb init.d]#
文档较长,想必各位读者也有点累了,让我们休息一下,敬请期待的阿弟的长文下篇....

请在登录后发表评论,否则无法保存。
